
How to Prepare Files for Print
The examples used are for InDesign, but can apply to Photoshop and Illustrator and the principles can be applied to PowerPoint as well. Keep in mind that PowerPoint is a viewing application by design and not a graphic design or layout application.
CYMK vs RGB
RGB is for viewing: monitors, screen or displays. CMYK is for print: offset, wide format or digital printing.
A lot of the colors you create in RGB mode are not achievable using standard four-color process printing. It is always best to create your document from the start in CMYK color mode to ensure that you have a better idea of how your colors are going to print. Keep in mind that the color you view on your monitor is, in reality, RGB even though you are using CMYK and the color you perceive while viewing your screen will differ from what is printed in CMYK.
Print Layout
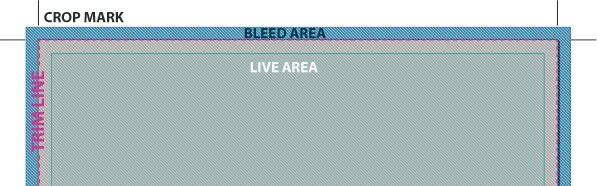
Trim Line: This is the finished size of the piece.
Live Area: The area that is considered safe to keep any important information within.
Bleed Area: The more bleed you can offer, the better. The minimum bleed you need for a printed piece is 0.125 in (1/8 in) but some instances require more than that. In most cases, the max is .25 in (1/4 in).
Crop Marks: Indicates where to cut the paper.
Multipage Layouts
All documents with multiple pages need to be set up in single pages as non-facing pages in consecutive order contained within ONE document.
Deciding to Use Black or Rich/Packed Black

When printing with black color, there are two types of black you can use.
Black – 100 K: should be used for text and barcodes
Rich Black – 40 C 40 M 40 Y 100 K: should only be used when using blocks of black
It may be hard to tell the difference when preparing files on your monitor screen since monitors show richer colors in RGB. Additionally, remove any unused colors before packaging file.
Collecting Files in InDesign (Packaging)
To collect and package your files in InDesign, go to File > Package.
A summary screen will pop up. Here, you will see any spot colors used, RGB images, image sizes and fonts in the file. You will see fonts used, linked images, RGB images, 4 color process and spot color information.
For a more detailed overview of each component, click through the navigation menu on the left side of the Package window. It is good practice to check these. Check the font/s you used in the document in case you need to remove anything saved on the pasteboard. Also check links and images.
If you only want to see errors such as RBG linked files, check the Show Problems Only option. If everything looks good, hit the Package button.
When collecting the native files for the packaged folder, make sure Copy Fonts, Copy Linked Graphics/Images and Update Graphic Links in Package options are checked.
Summary
Photoshop
- Create the file in CYMK color mode no smaller than 300 dpi (600 dpi is preferable)
- Remember to include bleed area
- Rasterize type layers Flatten layers
- We will accept EPS, PSD, and PDF files created in Photoshop
InDesign
- Create a file with a bleed
- Remove unused colors
- Package the file (see above)
- Check colors, images and image sizes
- Save Packaged folder
- Zip the packaged folder for uploading
- We accept PDFs and collective native files from InDesign
Illustrator
- Create the file in CYMK color mode
- Remember to include a bleed
- Convert type to outlines
- Link files and provide a folder with linked files to the printer
- We will accept high resolution PDFs, Ai, and EPS files from Illustrator
Tips
- For graphics, start BIG and go small, if needed. Nothing less than 300 dpi is
- Do not “copy and paste” or “drag and drop” graphics, PLACE them in your document to maintain links for
- Document dimensions should be set to size. It’s never a good idea to make an image larger than what it was designed
- When in doubt, convert to a high resolution PDF when submitting
- Know where your links are. You will need these when packaging InDesign
- If you are still using PageMaker, Freehand, CorelDraw or Publisher, you will need to generate high resolution PDFs as an
- Every print shop is different and will have different file requirements. Check with your printer before starting your design